Wednesday, November 30, 2011
OLD OTTOMAN/BENCH GETTING A FACELIFT
I got this ottoman/banch form another mom at my kid's school and I plan on getting it spruced up for the school auction. That is if I can get through all the layers of fabric. As it turns out it has already been upholstered a couple of times and each time someone used small little nails. About 50 tinny little nails later I'm ready to start.
For those who are just starting work on any furniture be sure that your tetanus shots are up to date. I chose not to use gloves during this projects (not knowing how old the ottoman was) as I thought it was just a small job, but ended up pocking my finger with a rusty nail. Good thing I just updated my shots during my physical exam this summer.
While I have really neat fabric chosen for this project (pictured bellow) I am still deciding on the color of the actual bench. I am tossing the idea of painting it black or distressed white. But one thing I did decide on was that I will make it a tufted little bench.
Using the button kit from a local craft store I made 4 buttons using the same fabric as the bench. Be careful when choosing the fabric and size of the button as you can end up having fabric that is too thick and will not work well when trying to make the button. Follow the instructions on the back of the kit, it's quiet easy. And ta-da!
So here it is. The fabric has been replaced and the custom buttons added. See my two little helpers? They are learning too, and so am I.
Now I am still debating what color to paint the bench. Hmm? There is a little off-white in the fabric so if I went with distressed cream I might be able to pull it of. Stay tuned.
I have decided to paint the bench a very subtle cream color. It may have been a mistake as I am still deciding if I like it. It matched the very light cream (that looks nearly white) on the fabric. I have also decided to use a little bronze/gold color on the edges as a distressed technique. I have never done anything like that before so I am learning as I go.
One mistake I did make was that I stapled the fabric too far from the edges, so when I went to screw the top back on the bench I realized that it wouldn't work. The screw was not long enough, (and I was not able to use longer screw because the wood was too thin) and it would not hold being screwed into the fabric and foam alone. So I had to un-staple all four corners, trim the fabric and the foam cover, re-staple closer to the edges (so that I can see the screw hole) and it finally worked. Awh! Learn from my mistakes.
The tree that is on one of the sides of the bench is done in the same bronze/gold that I used for edges. Recall that this item will be auctioned off at my children's school? One mom thought that we should have the kids from the Kindergarten class imprint their thumbs as leaves on the tree (yet to be done) as their participation in the project.
And there you have it. One old bench transformed into a whole new one~ I'd like it as my sitting bench for when I put my shoes on. Lovely.
Monday, November 28, 2011
SHABBY WREATHS
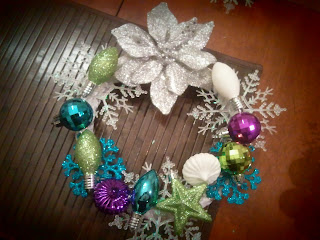
How much fun can it be to create a wreath? Well I made two, because making one was just not enough. Actually I made one in blue for my son Syler, and one in purple, for my daughter Evelyn. This is where that hot glue gun I told you about earlier comes in very handy. Shabby wreaths all around the house.
Most of my supplies came for a dollar store. I did buy few ornaments at the local Good Will.
_________________________________________________
Here are few more fun smaller wreaths we made for the teachers. Kiddos got to be involved and pick the ornaments they wanted for each teacher.
SNEAK A PEEK
Here is a little sneak peek at my next project. I found this awesome ball and claw foot coffee table. It appears to be quiet old and needs some work (I'm still trying to find out the exact age and who made it). The legs were starting to come unglued a bit so currently I am in the process of getting them re-glued. Since my plan is to turn it into a tufted ottoman I need to make sure that it will hold up well. I decided to go with liquid hide glue, as that was originally used on the table.
So far so good. Check back soon to see my progress.
Friday, November 25, 2011
A VERY SHABBY CHIC LAMP
I love the old country style, the shabby chic, classic and then a little bit of modern. So when I decided to design my daughter's bedroom I wanted it to be a "wow" factor for her. I spent time on lots of details and one of them being this cute lampshade. I had leftover fabric from few other projects that I worked on in her room, so I used them when I re-designed this lampshade. It was very simple. I used a hot glue gun and glued on the fabric, the ribbon and then hung the little diamonds. Can I say I am a huge fan of a hot glue gun. I use it all the time so if you don't have one go out and get one. They are very inexpensive. I used three types of fabric, and two types of different ribbons.
And here it is. A very simple and easy, yet effective way to spruce up a plain white lamp shade. Awh, the sweet wonders of a hot glue gun._____________________________________________
UNIQUE NAPKIN RINGS
I thought it would be fun to be a little creative and make my own napkin rings. I did however realize that they were a little time consuming, but in the end they were cute, and I was proud to display them at my dinner table.
Here is what you will need:
~A choice of ribbon (medium and small width)
~Some basic thin wire
~Sewing machine and thread
Cut the length of the wider ribbon to the size of the ring you'd like. Cut the wire to the size of the ring you'd like plus another inch. Sew on the more narrow ribbon on top of the wider ribbon folding it about 1/2" (see picture).
Sew the sides together. Note: for better effect use two different colored ribbons and opposite shade color thread (ex. black on white)
Insert the wire and fold it creating the ring. Fold the wire atop itself and twist.
To finish off the ring cut a small piece, about 1.5",of ribbon (of your choice, I went with the more narrow one) and sew it on the ring combining the two side.
__________________________________________________
Tuesday, November 22, 2011
FIXING UP A CRACKED BAMBOO VASE (trash to treasure)
I found this, cracked in half, bamboo vase from Pier 1. I thought it was cute and liked the brown and gold color.Although it appeared as an easy fix, working with bamboo is actually hard.
Using wood glue I did my best to glue down the top piece that broke off. As you can see on the picture the crack was still showing so I wanted to cover it up with something cute. I came up with this idea to use some simple tan colored ribbon. I fold it down about every 3" and glued it. I used the hot glue gun and it worked well. Afterwards I glued down some cute round rhinestones to the folded piece of the ribbon and hot glued the entire thing around the vase, covering up the cracks that were showing. It worked well.
Sunday, November 20, 2011
HOMEMADE HOLIDAY CARDS & FUN KID DECORATIONS
Holiday season is about family, giving, sharing, making memories and having fun. My kids love crafts and I decided to make some fun hanging cards with my two little ones this holiday season. It's fun, easy, and most of all it's something that the kids are proud to display.
Here is what you will need:
(the amount of noodles and the size of the paper is up to you)
~food coloring
~plastic cups for water
~noodles (few different shapes is fun)
~thick presentation paper in red, green and brown
~Elmer's glue
~some fun rhinestones
Add few drops of food color to about 8oz of tap water. Simply let the kids be creative and let them color the noodles. The longer they stay in the food color the brighter the noodle will be~but don't let them stay in there too long, or they will become soggy and will break. I would recommend no more than 3 minutes. Afterwards lay them down on the paper towel to dry.
In the meantime, using the red paper, cut a rectangle and using the green paper cut out the shape of a Christmas Tree. For the tree stand use the brown paper.
After the noodles have dried have the kids glue down all the paper pieces and then add the noodles and the rhinestone. Let the creativity and fun begin.
You can also use stickers, beans, and any other fun, kids safe, material you'd like. Remember to have fun.
Subscribe to:
Posts (Atom)