Thursday, December 18, 2014

TOPIARY SILVER-METALLIC HOLIDAY TREE

I love shiny things- and who doesn't. Let me show you a fun and creative way to make a silver-metallic topiary holiday tree. 

Topiary Holiday Tree - Handmade

I saw one of these little ones the other day at Michael's and I think it was around $25, so I thought to myself "I can make this" and as it turned out I can, and made it even bigger. 

While at Good Will I came across the topiary top only. The bottom, or the pot, was missing so I went ahead and picked it up along with a very heavy pot to go with it.

Here's a list of other items that I got:

Krylon metallic spray 
Silver ribbon
Silver ornaments of different shades. 
Silver garland 
Hot glue gun
Pine cones - different sizes are OK
Black sheer ribbon
Dry moss
Square Styrofoam


Silver spray painted pot

1. First thing I did was used the metallic spray and spray-painted the heavy pot, as well as the pine cones that I picked from my back yard. It only takes minutes before it dries. I would recommend that this be done outside because of the strong fumes. 

2. While the pot and pine cone dried I removed what was already on the topiary top and cleaned it off. 


Silver spray painted pine cones


Topiary Tree


Topiary Tree- bare


3. Using the hot glue gun I glued the silver ribbon on the trunk of the topiary top/ball and placed it into the square Styrofoam, then glued the entire thing into the spray painted pot. I then glued the dry moss and decorated the bottom of the trunk with ornaments and pine cones. 

4. I used a small

amount of sheer black ribbon and tied a couple of pine cones to the ribbon and then to the ball. 

5. Start decorating by gluing the ornaments and sliver freshly painted pine cones randomly on the ball.

Decorate topiary tree with ornaments. 
6. After using up all the ornaments and pine cones I placed the silver garland in between those, covering any sport of the  topiary top, and hot gluing it down. 


Topiary holiday tree- silver, handmade

In the end I was left with this gorgeous, handmade, silver and shiny, metallic tree which I am proudly displaying in the living room. 


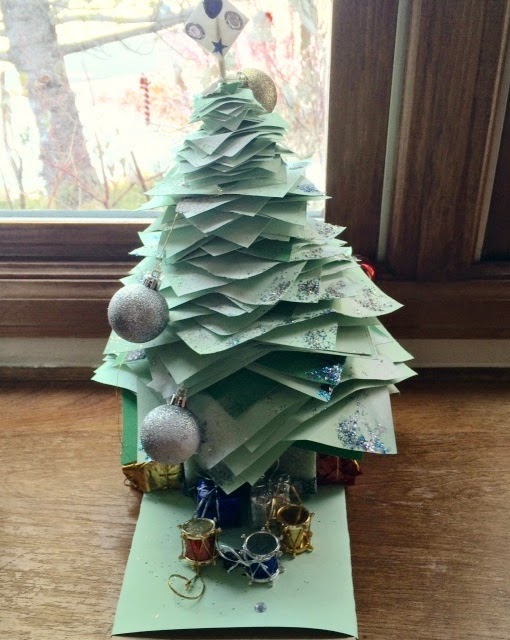
Paper Christmas Tree ~ Super cute decoration and a fun project to make


Paper Christmas Tree with ornaments


My kids absolutely enjoy crafting, and making things that they could proudly display. During holidays, in particular, we make a lot of things to hang, display and gift. One of the things we decided to make this year was paper Christmas trees and they turned out absolutely lovely.


Here's a list of things we used (you may use other or different decorations or colored paper):

- Thick green construction paper (cut into piles of different sizes- we did 6" down to 1" but there is no    need to be precise)
- Shish kabob wooden skewers (careful with these especially if you have really young ones as the top      is very pointy and poky)
- Square Styrofoam 
- Small ornaments 
- Decorative tape
- Glitter
- Glue
- Snow spray
- Rhinestones 
- Foam core board (used only for the star, you may use something different or make a start out of       aluminum foil)

Exiting thing, about these items you need, is that most all of them could be found at your local dollar store. 

1.Start by sticking the shish kabob wooden skewers with the dull side down into the square Styrofoam. 
Decorate the bottom of the Styrofoam with the decorative tape. You may need to glue it down even if the tape is sticky. 

2.Start with the biggest peace of paper (6") fold the edges downwards slightly and stab the paper trough the middle into the kabob stick. Repeat this until you feel you've reached enough of a thickness (about 6-8 sheets). When placing the paper on the stick alternate the edges/points. 

Making paper Christmas Tree
3. Repeat the step above with all the smaller pieces. As you work look at you tree and decided if you need more or less paper, or if you need to press the edges slightly. 

4. When you have placed the last paper on top take a small square (about 1") of foam core board and put it on top of the kabob stick. 

5. Start decorating with glitter, ornaments, rhinestones, and anything else that you might like. Make your own little garland. Spray with snow spray and place the tree on a display. Don't forget to take a picture and share.


Paper Christmas Tree Crafting


And look how adorable these have turned out. I am going to display these for years to come. 
These are also a great gift for family members. 
Craft away!


Paper Christmas Tree- handmade with ornaments, snow, star


Monday, October 13, 2014

SHOP TILL YOU DROP

I love Fall. It has a very particular and warm smell, and it makes me realize that the holiday season is just around the corner. I'm like a kid when it comes to the holidays- I enjoy decorating, shopping, wrapping presents, making crafts with the kids, making cookies, spending time with family and friends.... and I could go on forever. But what I also like is a great deal. So before I leave the house I always look for coupons, and most of the time I find them. Why pay a full price on something if you don't have to. Today I'm sharing Michaels 50% OFF coupon any one regular priced item. (Please read the fine print) Follow the link bellow for other great deals at Michael's.


Michael's 50% OFF Coupon

So start shopping already! 

Thursday, October 9, 2014

HALLOWEEN WREATH

If you know me you know I love making wreaths. And I know it's so much easier to just purchase one at your local Target store, but making one from scratch is just too much fun. 
So in the spirit of this Halloween here is a fun wreath made with all the supplies from the local Dollar store (Dollar Tree). The best part is each little pumpkin lights up. Can't wait to turn them on tonight and see how they all look in this fun and so scary wreath. 


Handmade Halloween Wreath

FROM TRASH TO TREASURE

My Finds

I love Goodwill shopping, but not just Goodwill, I love all thrift stores. Actually one of my favorite stores is the Habitat for Humanity ReStore in Denver.
Habitat Denver Restores

I found some great items at that store, and best of all they were new. But that's a story for another day, and although I can't wait to share with you what I found there, what I do want to talk about today is why I love getting things from a second hand store versus new.

First of all I LOVE a great deal and I do NOT love paying full price on things that I know I could get for much less. Second, purchasing things from the second hand store keeps less trash out of landfills. Third, buying things from places like Goodwill, ReStore, Savers, and etc., helps people in need. And fourth, did I mention that I love a great deal?

Hose Reel
So here is what I found yesterday at one of local Goodwill stores; a hose  reel cart by HoseMobile. It cost me $8.99, and they run on average about $35-40. So I think that was a great deal. Nothing was broken, all it needed was a little wash.
From someone else's unwanted items to my back yard, I saved around $30.
Unsightly hose without hose reel
 This was unsightly before, and our hose was just hard to reel up nicely by hand.

The best part about second hand shops for me is that I only buy things that I need, or would otherwise have to purchase new. What sort of finds do you have to share?
Neat hose thanks to hose reel


Thursday, September 18, 2014

BACK TO SCHOOL LUNCH IDEAS

Let me just start by saying that my lunches are not crazy healthy, because, well let’s face it, if I prepared the super healthy, out of this world lunch, my 2nd and 3rd grader would simply not eat them, however I try my best to pack whatever healthy things they do like and be creative. Just the other day my son said that some kids from his class asked him why he always eats healthy snacks.

Why don’t I let them by lunches at school? I do, on occasion. But one of the reasons I don’t let them buy lunches at school is because I have no control over how many sugary items they would get. In kindergarten my son told me once that he picked chicken nuggets, with a muffin, mandarin oranges (in sugar juice) and chocolate milk. Now to me that is a bit too much for him. When I pack their lunches I try to make sure that I don’t make a carb/sugar overload kind of a lunch. We also buy a lot of organic foods, and I like the idea of them eating homemade food and getting into a habit of realizing that eating ‘out’ (even if that means school lunch) is more of a treat and a special occasion.

School is back in session and coming up with healthy foods and snacks for our little ones can sometimes be tricky. Either we have no way to pack it, or the kids are simply just too picky to eat what we would prepare. There are many ideas out there for how to pack healthy foods for the kids, however if you have picky ones like we do, fresh veggies with ranch and a turkey sandwich on a whole wheat bread loaded with lettuce, tomatoes, and other good things for you, just won’t work. So what’s a mom to do? I prepare things that I know they love and make sure that their days are balanced.
One of the best investments we did was purchase a thermos. They are wonderful and are great for packing different hot lunches. They stay nice and warm trough the day. (http://www.amazon.com/Thermos-FOOGO-Stainless-Steel-Ounce/dp/B0025Y6742/ref=sr_1_1?s=kitchen&srs=2530615011&ie=UTF8&qid=1411061065&sr=1-1&keywords=foogo+thermos)

Here are some of the items I pack in the thermos:
  • ·         Soups and stews (side of sliced bread or crackers)
  • ·         Pot roast (with gravy or BBQ sauce)
  • ·         Grilled chicken/ or chicken tenders (with choice of dipping sauce)
  • ·         Hot dogs/ Mini corn dogs
  • ·         Veggie burgers
  • ·         Mac & Cheese
  • ·         Pastas
  • ·         Spaghetti
  • ·         Sliced turkey in turkey juice
  • ·         Casseroles


What is so fun about packing things like veggie burgers and occasional hot dog is that they get to build it themselves. On the side I will send them off with a bun and all the toppings they like, so they get to put it together nice and hot for lunch. Since they like most of the fruits, I will pack them fruit instead of chips. When I make the pastas and Mac & Cheese I will cook it with broccoli, peas, or cauliflower and mix it all together. They don’t mind it that way, and it’s a nice way for them to get the veggies in with their noodles. But if you have an extra picky one try mashing the cooked veggies and making them part of the sauce. It works really well with marinara sauce.  I also toss in a little bit of turkey, or grilled chicken for the protein.

Since their lunch is so late in the day they have a snack time at school and one of my favorite things to make for them is the parfait yogurt. It’s not only my favorite but theirs as well. We use Quaker granola with almonds and raisins; top it off with fresh cut strawberries, vanilla yogurt and a little more granola. Sometime I use frozen berries instead of fresh strawberries. It works if you don’t want to pack an extra ice-pack as the frozen fruit thaws just in time for snack/lunch time. Use any fruit your little one likes.

Another favorite snack for them is cheese, crackers and grapes. They tend to eat those up every time.
I make crapes from scratch and I always add extra egg whites to my crapes to load them up with a little extra protein. I use crapes to make them turkey and cheese wraps and on Fridays with Nutella as a special treat. Another yummy snack I make for them is a banana with almond butter. You could use peanut butter too, but my 3rd grader has a peanut allergy so almond butter works great. If you’ve never had almond butter with bananas you’re missing out on something amazing. I use Almond Natural More brand, definitely my favorite.
http://www.allstarhealth.com/de_p_ref/21203/pla21203/SNACLite_Almond_Naturally_More.htm?utm_source=google&utm_medium=GPS&utm_campaign=21203&gclid=CjwKEAjwheqgBRD5vOfR45az5AESJABy4m8-PmEDM3ABHEXmJLIhOFVT5yDWWnvujDuUSnQdSlsVmRoCcBDw_wcB

I send them off to school with water every day. We use metal water bottles by Klean Kanteen. (http://www.amazon.com/Klean-Kanteen-Stainless-Steel-Bottle/dp/B0092ZW6FG/ref=pd_sim_hg_2?ie=UTF8&refRID=0XFKSDBJAATTE2E1HEF0)
They are wonderful and don’t smell after a few sips.

Fridays are treat days, so they either get chocolate milk, apple juice, homemade crapes with Nutella, or some other sweet treat like pudding, or a Clif bar.

Now if you are wondering what we eat for breakfast it is eggs. Every day we have scrambled eggs with cheese, side of fruit and a toast. If I don’t prepare fruit then I mix in diced spinach, onions, tomatoes, mushroom, or some kind of mix of veggies, in with the eggs. Sometimes I make egg muffins. (recipe to follow). We also have oatmeal a couple of times a week with fruit and granola, in addition to the eggs. Our kids just don’t stay full if they only have oatmeal. Cereal is more of a treat for them, so if they eat their entire breakfast without any complains they are welcome to have a small bowl of Quaker Oatmeal Squares, Multigrain Cheerios or Honey Bunches of Oats.
As they get older their taste buds change, and they tend to love new things and not like things that they loved before. My goal is to keep feeding them things that are good for them, without being too restrictive.


Tuesday, March 6, 2012

FLOWER PEDALS LAMP SHADE


I feel bad for not being on my blog as much, and I have so many projects to share with you. Here is one small completed item that I can share with you for now.


The kid's elementary school was doing an auction to raise the money for the school and each class did a project that got auctioned off. The class project that I had the privilege to do was a lamp shade with the pre-schoolers. I wanted to make sure that the kids were included in the project and still make the item look chic and not too colorful or childish. We made flower pedals and I glued them to the ribbon and to the lampshade I picked up at a local Target store. I already had the lamp so I wanted to make sure that the colors all worked together.

Here is a quick run of what we did.

I cut out two different size fabric circles and taped them on a paper for the kids to color. Each child got one large and one small fabric circle. To stay within the color theme I let the kids chose from the earthy colors like brown, yellow, white and red, and each child got to be creative with their fabric circles. They were allowed to mix colors as they desired.

After the paint was dry I layered the fabric circles with one other fabric circle and one circle cut out from a book page. Everything was put together with a button in the middle. I squeezed each pedal so that it got more of a 3D shape and more realistic look to it and hot glued them on the lamp shade.

There are other ways to create the flower pedals this was just one way that worked for me this time.