Thursday, December 15, 2011

I MUST SHARE- Kindness Ranch


I love animals and I would really love to share with all of you a very special ranch out in Wyoming. It's called Kindness Ranch and is the only sanctuary in the US that takes in all kinds of research animals. While new, it is the result of a decade of work, saving, and planning.

From the site:

Laboratory animals have long held a special place in the heart of Dr. David Groobman, Founder of Kindness Ranch. Successful in business, Dr. Groobman first saved enough to provide for his family into the future. Once this was accomplished, he dedicated all the profits of his business for ten years to the ranch. He searched four years to locate the perfect 1,000 acre parcel near historic Hartville in Wyoming.

Groobman’s passion attracted caring board members to the cause. Together, they began planning for a sanctuary with the expectation that the residents will always receive the best in animal care and that dogs and cats would be rehabilitated in a home-like environment. Ground was broke in 2006. After building four guests yurts, a dog yurt, a cat yurt, and a managers’ yurt, construction was finished in the summer of 2007.

The benefits to the animals are obvious: they are well-cared for in every aspect of their lives.

_____________________________________________

Kindness Ranch- my heroes all year long.

Wednesday, December 7, 2011

MY NEW TREASURE- 1982 Charisma Cane Chair


I am so excited to show you my next project. I found this beautiful Charsima Chair in amazing, mint condition for $13. Even the fabric is in such a great shape that I feel bad ripping it off.
This chair even came with the original receipt- how neat. Now I am thrilled to go shopping for fabric. One thing that I'm certain is that I will not be painting the chair. It has very neat detail on the legs and the stain is in great shape.


Some of the fabrics that I have been looking into are shown below. Such a hard decision. Opinions are encouraged.


Saturday, December 3, 2011

FIXING BROKEN CHRISTMAS TREE TOPPER


Christmas tree toppers are not always, and only, for Christmas trees. Just like not all ornaments are meant to be hanging on the tree. Mine is being displayed as a decorative feature in a vase.


It's a snow day here in Denver. That means more small projects are going to get done. Well maybe at least one.

I got this super cute $30 Christmas tree topper for free. Yes, for free, but that's because it was broken. The top of this wonderful yet fragile ornament broke off. Everything else was intact so I thought what an easy fix.


I hot glued the top back on, but it wasn't a perfect fit and the glue was showing. So to fix the problem I added small rhinestones around where the glue was to hide it. To spruce it up a little more I added more larger rhinestone to the middle tier. And now for the price of FREE a cute little holiday decor.


Friday, December 2, 2011

QUICK UPDATE REGARDING THE PARTY

So I tried to do a contest giveaway but since I am still very new at this I had to cancel it. Things were already going wrong. Live and learn I guess. For now I will try to create a party for everyone to show off their Holiday Decor. Please hang in there with me as I learn this process. I do plan on reinstating the contest in the very near future.

So here it is. A Show Off Party- share with is us what have you been working on.

1. The contest should be holiday theme decor.
2. Please grab my button and add it to your post or the sidebar and become a follower if you would.
3. Please take time to check out what others have been working on.
4. Make sure that your URL is to the actual items and not your blog URL.
5. Have fun and enjoy.

Anesa

Thursday, December 1, 2011

HOLIDAY WALL DECOR


Holidays can be so much fun. Probably the funnest time of the year for me. I love decorating, the smell of cinnamon and gingerbread, apple pie, and the all the amazing lights. This year I decided to give my dining room wall a little holiday gear. I removed the two pictures and replaced them with a curtain rod, and got busy. One of my lovely shabby wreaths I made this week is proudly displayed on the wall. But it's not finished yet. More little decorative features are coming.

BEFORE


AFTER


Katie's Nesting Spot
Photobucket shabby creek cottage

Wednesday, November 30, 2011

OLD OTTOMAN/BENCH GETTING A FACELIFT


I got this ottoman/banch form another mom at my kid's school and I plan on getting it spruced up for the school auction. That is if I can get through all the layers of fabric. As it turns out it has already been upholstered a couple of times and each time someone used small little nails. About 50 tinny little nails later I'm ready to start.


For those who are just starting work on any furniture be sure that your tetanus shots are up to date. I chose not to use gloves during this projects (not knowing how old the ottoman was) as I thought it was just a small job, but ended up pocking my finger with a rusty nail. Good thing I just updated my shots during my physical exam this summer.

While I have really neat fabric chosen for this project (pictured bellow) I am still deciding on the color of the actual bench. I am tossing the idea of painting it black or distressed white. But one thing I did decide on was that I will make it a tufted little bench.

Using the button kit from a local craft store I made 4 buttons using the same fabric as the bench. Be careful when choosing the fabric and size of the button as you can end up having fabric that is too thick and will not work well when trying to make the button. Follow the instructions on the back of the kit, it's quiet easy. And ta-da!


So here it is. The fabric has been replaced and the custom buttons added. See my two little helpers? They are learning too, and so am I.


Now I am still debating what color to paint the bench. Hmm? There is a little off-white in the fabric so if I went with distressed cream I might be able to pull it of. Stay tuned.

I have decided to paint the bench a very subtle cream color. It may have been a mistake as I am still deciding if I like it. It matched the very light cream (that looks nearly white) on the fabric. I have also decided to use a little bronze/gold color on the edges as a distressed technique. I have never done anything like that before so I am learning as I go.


One mistake I did make was that I stapled the fabric too far from the edges, so when I went to screw the top back on the bench I realized that it wouldn't work. The screw was not long enough, (and I was not able to use longer screw because the wood was too thin) and it would not hold being screwed into the fabric and foam alone. So I had to un-staple all four corners, trim the fabric and the foam cover, re-staple closer to the edges (so that I can see the screw hole) and it finally worked. Awh! Learn from my mistakes.


The tree that is on one of the sides of the bench is done in the same bronze/gold that I used for edges. Recall that this item will be auctioned off at my children's school? One mom thought that we should have the kids from the Kindergarten class imprint their thumbs as leaves on the tree (yet to be done) as their participation in the project.

And there you have it. One old bench transformed into a whole new one~ I'd like it as my sitting bench for when I put my shoes on. Lovely.


Monday, November 28, 2011

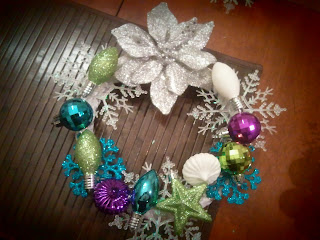
SHABBY WREATHS


How much fun can it be to create a wreath? Well I made two, because making one was just not enough. Actually I made one in blue for my son Syler, and one in purple, for my daughter Evelyn. This is where that hot glue gun I told you about earlier comes in very handy. Shabby wreaths all around the house.


Most of my supplies came for a dollar store. I did buy few ornaments at the local Good Will.


_________________________________________________
Here are few more fun smaller wreaths we made for the teachers. Kiddos got to be involved and pick the ornaments they wanted for each teacher.


The DIY Show Off


SNEAK A PEEK


Here is a little sneak peek at my next project. I found this awesome ball and claw foot coffee table. It appears to be quiet old and needs some work (I'm still trying to find out the exact age and who made it). The legs were starting to come unglued a bit so currently I am in the process of getting them re-glued. Since my plan is to turn it into a tufted ottoman I need to make sure that it will hold up well. I decided to go with liquid hide glue, as that was originally used on the table.
So far so good. Check back soon to see my progress.


Friday, November 25, 2011

A VERY SHABBY CHIC LAMP


I love the old country style, the shabby chic, classic and then a little bit of modern. So when I decided to design my daughter's bedroom I wanted it to be a "wow" factor for her. I spent time on lots of details and one of them being this cute lampshade. I had leftover fabric from few other projects that I worked on in her room, so I used them when I re-designed this lampshade. It was very simple. I used a hot glue gun and glued on the fabric, the ribbon and then hung the little diamonds. Can I say I am a huge fan of a hot glue gun. I use it all the time so if you don't have one go out and get one. They are very inexpensive. I used three types of fabric, and two types of different ribbons.

And here it is. A very simple and easy, yet effective way to spruce up a plain white lamp shade. Awh, the sweet wonders of a hot glue gun._____________________________________________